Thursday, September 29, 2011

Final Pics

Ok, unless something newsworthy happens (e.g., a product fails or something blows up), this will probably be my last blog post. It's been fun! PB hired photographer Mel Curtis to take some nice photos of the final result, which you can view in a web album here. This one's my favorite, but do click through to see all of them:


Our house has recently gotten some great blog coverage, such at Contemporist, ArchDaily, Dezeen, HomeDSGN, and a few others; they're also great places to see our final photographs laid out in one page, and read people's snarky comments. I hope my blog helps you in a future project, or at least convince you that it's possible to build affordable modern!

Deck Lighting and Other Tips

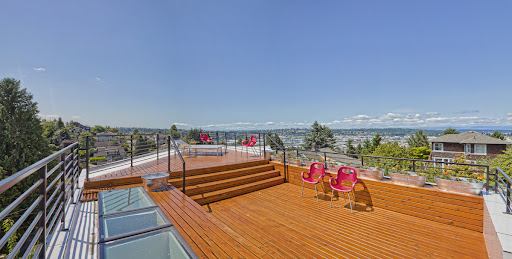
Ok, it's time to finish off the blog with a few more details that I think will be useful to others trying to build affordable modern homes. First, I want to show the completed rooftop deck. As you may recall, our biggest cost overrun came from our decision to extend the roof-top deck out onto the cantilever where the views are best. Well, here is the final result.


[Photo by Mel Curtis]

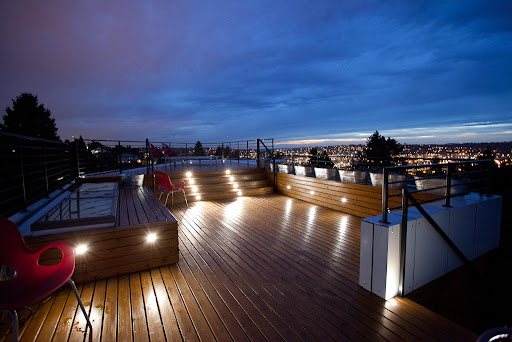
The powder-coated aluminum railings were the most expensive component; cedar decking itself is rather cheap. However, it does require maintenance; we actually had our first re-coat of stain applied just a few months after moving in. Now a night-time shot:


I'm super excited by how the lighting turned out, and it's not a well-known product: they're called Dek Dots, made by Dekor. They're very small, low-voltage, LED lights that are installed flush to the surface, resulting in a super-minimal profile that can be walked on! You barely see them when they're not lit (try to find them in the first pic above). We actually stumbled onto this option; the original plans called for standard recessed outdoor lights, but it became clear on-site that cutting into the roofing membrane to install them would be a bad idea. These lights run on landscaping wire, so could be installed directly on the decking. All told, we spent about $350 on 20 of them! Highly recommended, and I wish we had used them for all our outdoor lighting.

Ok, now for two random tips that don't merit their own post, but that I wish I had know earlier.
1. Recessed lighting trim can be expensive! Our Juno 5" cans call for their 215W-WH trim, which runs about $20 each online. BUT, it turns out Juno has a super-secret "economy" line of trims, called VuLite, that you won't find for sale online or in normal stores; they're generally only sold through electrical supply stores that work with builders/contractors. These run about $7 a trim, and look almost identical to the 215W-WH; they feel a little plasticky, but you certainly won't notice once they're 3 feet above your head! So walk into a local electrical supply store and ask for VuLite trims; they'll give you a surprised look, and you'll save lots of money!
2. Our plans called for recessed lights in the ceilings of our closets. This is a bad idea, in part because your clothing isn't that well lit from above, but also because the electrical code calls for lensed trims in closets (just like in showers). These trims are quite expensive, around $50, not including the cost of the can itself! Instead, go for a fluorescent bar mounted just above the closet door; it lights very evenly, is energy efficient, and a 2' fixture costs about $20.

Thursday, July 7, 2011

A Little DIY

We've lived in the house for about 3 months, now, and we're loving it! But clearly I've let the blog lapse, and there are a few details that I feel will be useful to others building an affordable modern home, so I'll try to write a few more posts.

One of the ways to keep the costs of building a home down is to take on some of the tasks yourself. The benefits of this varies, of course, with how much you value your time, and how handy you are. I'm certainly not that handy, so I kept my DIY tasks to a minimum: laundry room cabinets, and built-in closets.

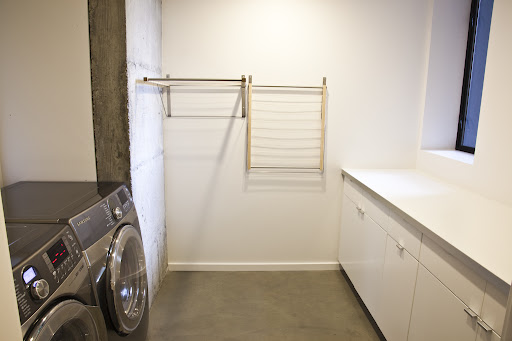
Here is a shot of our laundry room; I picked up and assembled our IKEA laundry room cabinets and countertops.


I had the finish carpenters actually set the cabinets and cut down and install the plinths and counters, since I didn't trust myself to do that well. IKEA cabinets are great and very well priced, but they're only cheap if you assemble them yourself. It's not a small task, as you can see from this stack of boxes I snapped before leaving IKEA.


I can only imagine how long it would take to assemble a whole kitchen. We choose the Applad white drawer fronts, and the Numerar white laminate countertop with aluminum edging ($99 for 8 ft of counter!). We also hung several IKEA clothes drying racks on the wall. On the left is our amazing Samsung washer and dryer (WF448AAW & DV448AEW). This brings up another tip; if your construction schedule allows, take advantage of Black Friday! These are the top-rated models available, and we picked them up for nearly half of their normal price ($750 each). Even better, we didn't have to brave the insane lines at Sears; we just sent the advertisement to our rep at Albert Lee, and he matched it. A few days after Black Friday, they were selling again at about $1300 each.

Another DIY project was our built-in closets. We originally only had budget for "rod and shelf", but I knew how important storage would be. So we decided to order custom built-in closets from easyclosets.com, and install them ourselves (with a little help from our friends). These were a bit more complicated then IKEA cabinets, but well worth the effort.

Easyclosets lets you enter the dimensions of your closets in their online planner, and design your own closet arrangements; they then custom cut all components so you can use every inch of closet space available to you. Their planner is surprisingly well-designed, though you can also call an agent and let them design them for you. We tried it both ways, and found their agents did a better job. We also considered the Container Store's popular Elfa system, but found it disappointing; it was much harder to customize to fully utilize our precious closet space (most components can't be cut), and Elfa was actually more expensive (even during their annual sale!).

So, we ordered three bedroom closets, a linen closet, and a coat closet. In total, we got over 1400 lbs of custom-cut melamine shelving, drawers, and metal components in over 50 boxes! UPS was a little flabbergasted. It took a solid 5 days with multiple friends to install, but the closets turned out great. Here are some shots.


If I have one negative, it's that I could smell the particleboard off-gassing for a good month or two. Easyclosets claim on their site that the particleboard meets the strict California requirements for formaldehyde, but my nose definitely picked up the smell. So, I would suggest clear-coating the exposed edges not covered by melamine with a water-based polyurethane.

Tuesday, April 26, 2011

Wallpaper and Bamboo

You all thought this blog was finished? Not at all! I still have 4-5 posts to make, each of which should help those building their own modern houses. I'm just a bit behind schedule, because I seem to spend most of my evenings assembling furniture — one of the downsides of moving into a bigger house!

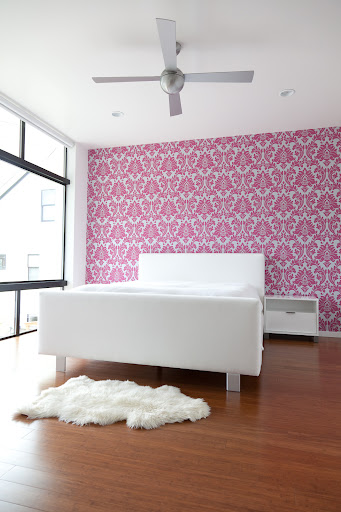
On to the topic of this post. What do bamboo floors and wallpaper have to do with each other? Nothing, but they are both beautifully illustrated in this picture, so I decided to combine the posts.


Wallpaper

Wallpaper has become popular again in modern interiors; brands like Graham & Browne and FlavorPaper put out patterns that manage to retain a strongly modernist feel. We loved the idea of adding a few pops of strong color and texture to our otherwise very minimalist interior, so we did three accent walls in wallpaper. Above you see a wall in Graham & Browne Majestic, Hot Pink. We also did a wall in our daughter's room (sorry, no link; Elke found the rolls on a sale table in a random kids store in Antwerp, Belgium), and a wall in our family room in Thistle by Timorous Beasties out of Scotland (sold locally by Ornamo). Here are pics.


Bamboo Flooring

For the bedroom level of our house we wanted a warmer feeling floor than the concrete floors we have elsewhere; our goal was the look of hardwood floors, but sustainable, inexpensive, tough to ding or scratch, and minimal off-gassing. We quickly turned to engineered strand woven bamboo; bamboo is sustainable, and strand woven bamboo has more of a natural wood grain than the vertical grain of traditional bamboo flooring (which looks a bit 90's). Strand woven bamboo is also rock-solid, with Janka ratings of around 3000.

So, we ordered a bunch of samples of products under $4 per square foot. The samples from Cali Bamboo stood out; they were much heavier, thicker, and more solid-feeling than the other products. Cali sells straight to the customer from their web site, which is why they are able to inexpensively sell a similar product to more expensive brands like EcoTimber. Their flooring is also formaldehyde-free. So, we choose to order their product (both flooring and stair treads/risers) in the Java color.

Before ordering, I became a "fan" of Cali Bamboo on Facebook. A hint to those building: become fans of every company or product you're thinking of buying, because they often post discounts! Fortunately for me, a 10% discount code for the Monterey Home Show appeared on their Facebook page just before I ordered, and I managed to save around $500. You may loose street cred when your profile page shows that you've become a fan of, say, the Container Store, but it's worth it.

After a week or so, a shipment of 3.5 tons (!) of bamboo arrived. Just getting that material into the house was quite a challenge (and, unfortunately, resulted in quite a few billable labor hours). The flooring was installed and beautiful in just one day, though, which was quite different than the efforts required for concrete floors. Here are some closeups:


So I definitely recommend strand woven bamboo flooring from Cali, though there are some things you should be aware of:
  1. The stairnose we received from Cali was part of a different production batch, and was dramatically darker than the flooring. Cali made a lot of effort to make it right: they had me send a sample of my flooring to them (at their cost), and they spent weeks going through multiple shipments to color match it. They failed, though, and ended up refunding me the stairnose money. Fortunately, we found a piece of matching stairnose at Bamboo Hardwoods. In general, color variance in strand woven bamboo is high, so that's something you might have to deal with.
  2. Though everyone brags about Janka hardness, note that the easiest way to damage prefinished flooring is to scratch the finish; these scratches don't reach the bamboo that the hardness scale is measuring. Scratches can be removed by re-finishing the floors, but of course this takes time and effort. We've certainly never seen any dings or dents, which is great, but scratches happen.
  3. We saved money by ordering the flooring ourselves rather than through our flooring sub; however, the story is not that simple. We had to pay Logan's for the hours required to bring the flooring (3.5 tons!) into the second floor of the house, while the sub would have included this in his overall materials + install bid. So, it's easy to overestimate the savings of ordering materials yourself.

Finally, the fan you see in the all the bedrooms is the Ball Fan by the Modern Fan Company.

Monday, March 28, 2011

The Final Kitchen

I earlier did a work-in-progress post on the kitchen counters and cabinets; now I'm happy to report the final result! First, a couple photos:


Here are the additions since the last post:

  • Lighting: We choose the Gregg Suspension by Foscarini for the three pendant lights over the island. This was a bit of a splurge for us, but we loved the organic dinosaur egg shape. We choose to have a consistent theme in the house where all our non-recessed fixtures are pure white shapes of glass illuminated from within, without any adornments of any kind. This is also a good opportunity to mention the Castore Suspension by Artemide that we put over the nearby dining table. We managed to get a floor model at the Seattle Artemide store half off!


  • Kitchen Faucet: We used the Interaktiv S by Hansgrohe. This was another fixture that we bought on Ebay at a significant discount; I think Ebay is a good choice for a few key, expensive items, IF you have a good nose for ferreting out dodgy sellers.
  • Appliances: I already mentioned the BlueStar range and kitchen sink in the earlier post. We then added Bosch appliances: a French door refrigerator, a combination convection microwave/oven, and a dishwasher. Choosing a convection oven was key for me, and I'm already loving the browning I can get from it. Since we didn't have room for two ovens, I choose a microwave that can double as an oven. I ideally wanted a microwave that could convection broil, as well, since I often want to hit something with a quick broil while the oven is roasting at a lower temp, but alas, the price bump for this feature was too much for me. For ventilation, we have a Broan internal blower up in the roof and a Broan 36" hood above the range. I was hoping for a bigger whoosh of air from the 1,100 CFM, but it works reasonably well none the less.
  • Backsplash: Behind the cooktop we went with two solid pieces of back-painted tempered glass above and below the upper cabinets. This choice was more expensive than we wanted (almost $30 a sq ft. installed). But, it kept the gray monolithic look of the interior plaster on the other side of the wall, and is very easy to clean (which I've already taken advantage of, since I'm still getting used to the real heat of the Bluestar and caused a mini grease fountain the other day).
We also have a large pantry behind the kitchen for additional storage. Anyways, that's the wrap on our design of the kitchen! It turned out great, with one small caveat. The black veneer of the cabinets is easy to ding or scratch, and these show up very easily on the reflective black.

Wednesday, March 23, 2011

Bathrooms

Here are some details on the interior design of our bathrooms. We decided to use the same finishes in both full bathrooms, and a different set of finishes for the two powders.

As a space-saving measure, our master bathroom is designed to be continuous with our bedroom; it was otherwise challenging to fit three bedrooms, two bathrooms, and a large master closet in one level of our tight building footprint. Here is the view from our bedroom:


As you can see, there's a lot going on in a tight space. At the back are three black Milgard aluminum windows, looking out onto exterior siding (we plan to frost these windows for privacy). Moving from back to front, we have two floating mirrors with Itre Cubi wall lights mounted on them (unfortunately not illuminated in this image). Then, we have the same white Quantra quartz used in our kitchen on the backsplash and counter. The floating cabinets are Pacific Crest Amero with Metro doors, and the undermount sinks (great for cleaning) are Kohler Verticyl; these are the most rectangular sinks we could find to help maintain our right-angled theme. The faucets are Grohe Essence, which I managed to snag on Ebay for a great deal (a bit scary, but it worked out). The cabinet pulls are Ikea. The black wood-look floor tile is Anne Sacks Xylem in Ebony.

Here are some close-ups.


To the right of the double-sink is the shower/tub, which is fully enclosed in glass. We had originally planned on an open shower without a door, but we were worried about splashes and cold drafts. This much shower glass cost quite a bit, unfortunately.


Inside the enclosure, all of our hardware is from Danze, which is an affordable brand with lots of modern options. We have a wall shower, rainhead, and hand shower; each can be on or off, so there is a separate dial to select between the 8 possibilities (maybe not the best interface). The wall tile is Metro by Arizona Tile, sold locally by Statements.


You can see the lack of a floor threshold between the shower and the rest of the bathroom, as well as the storied linear drain above. It turned out great, but was it worth the extra cost? Hard to say. Finally, within the shower enclosure we have the Kohler Archer jetted tub, with its own filler. This is probably the only affordable and reasonably modern jetted tub available, at least that we could find.


We used the same tub, without jets and with an integral apron, in the kids bathroom. We would have preferred a tiled apron rather than plastic, but in yet another oddity of the plumbing world, it turns out that alcove tubs without aprons are remarkably expensive. Getting an alcove-style tub with an integral "tile bead" (basically a raised lip) is important, however, for waterproofing in a combined shower/tub, so we just went with the integral apron.


To the right of the tub is a Toto Acquia II dual-flush toilet, which we used in all bathrooms.

Finally, the two powder rooms. We used floating countertops of Quantra quartz, but otherwise tried to keep costs low, here. Remarkably, our cheap sinks and faucets turned out higher quality than we expected. The vessel sink is by Kraus, and the faucet by Vigo. That faucet cost less than a nice dinner, but the quality is surprisingly good!


Phew. Bathrooms involve a lot of choices, I almost forgot how many until I wrote this post. Overall, though, we're really happy with how it all turned out.

Tuesday, March 22, 2011

Moved In!

We moved in this past wednesday! I apologize for the lack of updates, the last month has been absolutely crazy. Between dealing with all the last minute issues, putting in some sweat equity by installing all the closets myself, and moving, I haven't had the chance to blog. Our house was also featured this past Sunday in the Seattle Tour of Architects, so we had to be unpacked and clean-looking in fours days!

Anyways, I still plan to do careful posts on all the decisions we've made, so don't worry. We've shot some pictures, and you can see a gallery here.

So, for my first post-move post, let's talk about how the concrete floors turned out. First, a couple pictures.


In the end, they turned out great, but it was quite a saga with several sleepless nights (building a house is stressful!). The bamboo floors were banged out in one day, but concrete is a much more complicated beast. Once we finally took up all the protective coverings, things didn't look so hot. There was a "runway" down the middle of the room caused by the boundaries of the protective paper.


There were also long tape marks, and boot marks(!) in the living room. The first hope was that a light sand, at 80 grit, would lift most of it up, but that wasn't the case. Our concrete finisher, Maverick Specialty, told us that the marks were fairly deep in the concrete. Our options were to sand deeper down, which would expose aggregate and give a pebbly look, or to apply a stain. I was pretty worried about the idea of stain, since most stained concrete floors are a highly variegated brown created by acid staining, rather than a natural concrete look. However, this stain was acrylic, and could be done in a natural gray. We put down two light coats; the result is that you can still see the natural patterns of concrete through the stain, but the offensive marks now blend in and can only be seen if you know what to look for. After staining, we put down a sealer (Scofield SelectSeal-W) and several coats of glossy floor wax (Diversey Vectra). The end result looks great.

So, what are the lessons from our experience with the concrete floors? There are several:

1. Concrete floors always have marks and other patterns which give it a somewhat industrial look (unless you polish the floors, which is a whole different thing, and more expensive). When you see the pictures in Dwell with beautiful minimalist concrete floors, realize that if you looked at them up close you'd probably notice more defects than you can see in the picture.
2. I always thought concrete floors were cheap, but that's not really the case. In the end, our strand-woven bamboo floors on the second floor were cheaper. Once you include pouring, prepping, and sealing, you're probably looking $9-$10 a square foot, whereas woven bamboo will run $6 installed (more on that flooring, later). Of course, for the ground floor, if you're already pouring a slab anyways, finishing concrete is cheaper than adding another flooring.
3. Get a decorative concrete guy involved early on, so he can make sure the floors are properly protected from other trades. For the first two weeks after pour, nothing should be left on the concrete (objects leave shadows during curing), workers should wear booties, and so on.

In the end we're happy with our concrete floors; they're pretty, and have great thermal mass for the radiant heat. But I lost a lot of hair over them!

Sunday, February 20, 2011

Stucco, Bookcase, Stairs

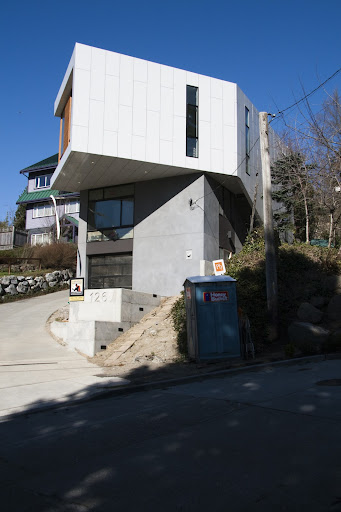
Progress is chugging along, though the schedule has slipped. We're probably looking at another 2-3 weeks before completion. The big excitement of the last couple days is that the exterior scaffolding has come down! Here are some exterior shots.


The bad news is that the scaffolding will go back up after the driveway and exterior stairs are poured! The exterior stucco has proved more challenging than expected, since we're using an unusual product that looks more like a concrete skim coat than traditional stucco; it will probably be the last task completed in the house!

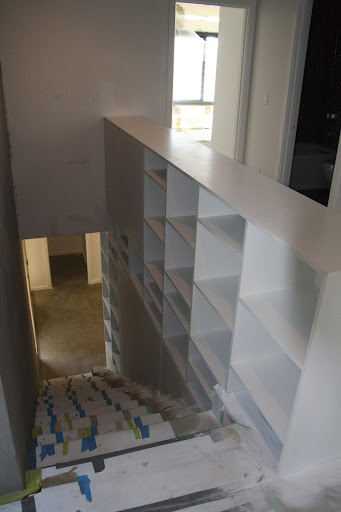
Two interesting architectural features on the interior are complete; a large bookcase, and interior stucco walls. The two-story bookcase forms one side of the stairs, beginning on the first floor and extending up to the second floor to serve as the guardrail. It's built with painted MDF, and the carpenters did a terrific job; I cannot find a single flaw. On the first floor, the bookcase includes a bench area to sit and put on shoes, and has storage below for boots and shoes.


The bookcase is double-sided, with sections alternately open to one side or the other. Here it is rising up the stairs.


And from the second-floor hallway.


This photo also shows the interior stucco, which was an addition to the original plan. The stairs scissor around this wall, and the wall is sometimes indoors and sometimes indoors, so we we decided to extend the exterior stucco finish to the indoors to make the indoor/outdoor transition more seamless.


You can also see the floating stair treads with windows below leading to the third floor. It was a sunny day so the image really highlights the light. The stair treads have an LVL structural core, and are wrapped in strand-woven cross-laminated bamboo plywood from Bamboo Hardwoods. The pieces are mitered together to give the appearance of one thick, solid piece; the treads are attached to the wall using hidden Simpson hardware.

Concrete Floors and Decks

Our house has concrete floors on both the first and third floors. They're not yet complete, but concrete floors are a complex beast so I thought I would post on the story so far. Our goal is to have smooth, subtly reflective, gray concrete floors. We like natural concrete; we're not going for a highly reflective polish, or a sanded look that reveals pebbles and aggregate in the concrete. The first floor slab already looks pretty good, it just needs construction soiling, tape adhesive, etc., cleaned off before applying a penetrating sealer (probably Consolideck LS).

The third floor is three-inch-thick lightweight concrete. Most parts look great, like this:


There are some black splotches, though:


These could be hand troweling marks, or entrapped moisture from the curing process. We're getting some expert opinions, but solutions can include grinding the areas down, or using vinegar to lighten the areas. Once they're resolved, we'll seal the floors and apply some sort of floor wax to protect the finish.

Another notorious aspect of concrete is cracking; contractors will tell you that cracks cannot be completely avoided. We're fortunate to have only hairline cracks, that you can't even feel when you run your finger over them. Here's the biggest one, though it looks much smaller in person.


Moving on to decks. Our biggest addition is that we extended the rooftop deck out on the cantilever. It looks incredible. There's a whole lot of deck up there, which is important since we have a very small yard.


Next week the metal railings will go in, so it won't look quite as open. But it will be much more safe.

We also have a deck off the kitchen. Between the cedar siding and cedar decking, it feels like a cozy wood lodge up there.


The downside of all this cedar is that it has to be maintained; sanded and stained every 1-2 years. We're using a Sikkens stain. But it looks incredible so far, as did the view today!

Saturday, January 29, 2011

Kitchen Cabinets and Countertops

I've given up waiting for pristine conditions to shoot photographs; dust and protective brown paper and plastic are just a fact of construction. Clean and bright photos probably won't happen until after final cleanup, so here's a post on cabinets and countertops.

To me, the kitchen is the central component of the home, so it merits lots of attention. Options for modern cabinetry are plentiful. At the high end there is a multitude of drool-worthy cabinets from Italian companies like Poliform, ArcLinea, and Scavolini, Bulthaup in Germany, and HenryBuilt here in Seattle. Locally-made custom cabinets, such as those by Seattle's Build or Kerf can also be modern and minimal and beautiful. However, all these options will run you $30k-$60k in cabinets alone. At the low end, IKEA makes terrific kitchen cabinets, despite what many contractors will tell you. However, they have a limited range of finishes, and the sizes can't be easily customized. Also, note that IKEA cabinets are only cheap if you pick up the boxes and assemble them yourself; otherwise the labor hours rack up too quickly. We choose this option for our laundry cabinets, and just had Logan's set the already assembled boxes. (There will be another blog post on this little round of sweat equity.)

In between these options are semi-custom cabinets, such as the Amero line from Pacific Crest. They have a huge range of doors/finishes, boxes can be customized to the half-inch, and prices are low; we spent around $8k for our kitchen and two bathrooms. (Though we have a below-average number of kitchen cabinets, since we have a huge walk-in pantry just behind the kitchen.) We choose the Metro door in black-stained Red Oak for the lowers, and the Jazz door in white gloss for the uppers, wrapped in Oak finish panels. All the lowers are soft-close full-extension drawers, which are much easier to use than lower cabinets. Notice that the uppers actually cantilever out; the boxes are attached to a support beam that was then wrapped in finish panels to hide it (try to do that with IKEA!). Behind the uppers is a staircase to the lower floors. The kitchen island counters extend an extra foot to form a bar.
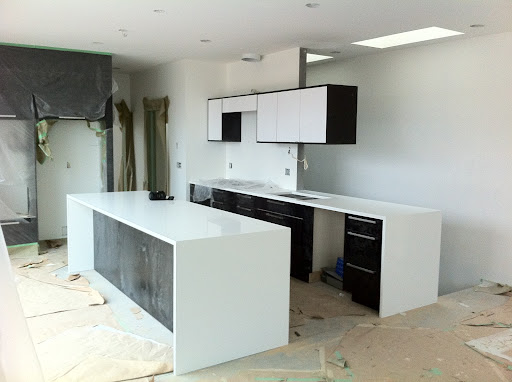


Along the back wall and wrapped in protective plastic is a floor-to-ceiling bank of cabinets and finish panels that will house the oven/microwave and refrigerator. This bank was supposed to be 30" deep so that it can hold a full-depth fridge; however, it was accidentally built 24" deep. This will be fixed in the next couple weeks.


Cabinet hardware is another easy way to get spendy; Omnia and Linnea make great options. We instead went with IKEA hardware; heavy and long Tyda handles for the lowers and minimal Strecket handles for the uppers.

The other huge choice to be made in kitchens is the countertops; we wanted solid counters as white and textureless as possible, but without the plastic-y feeling of acrylics like Corian. The natural choice is Quartz composite, made using the Breton process. Here in Seattle Caesarstone and Pental Chroma are the most common; however, their whitest options still have a fair amount of texture when viewed closely, and we were afraid our extremely white uppers would make this texture even more obvious by reference. We got a tip that Quantra counters, a new product from India sold locally by Meta Marble, had the whitest Quartz available, and indeed you can see that they're very white! Surprisingly, it wasn't any cheaper than more established brands, probably because it comes in a 3cm thickness rather than the standard 2cm. We're thrilled with how it turned out, though, especially the waterfall pieces extending to the floor!


As an aside, getting these huge 8' slabs up to our third floor was quite a challenge. They ended up renting a lift, and it took six guys to wrestle the pieces.


Our cooktop is a 36" drop-in from BlueStar (well-known in foodie circles as providing the highest BTUs available in a consumer product), and the sink is a double-bowl zero-radius stainless steel model by Vigo (remarkably inexpensive compared to the more common Franke version, which can run in the $1000s).


The rest of the appliances, kitchen faucet, and island pendant lighting still need to be installed to complete the look and function, but overall I think we managed to create a totally hot and modern kitchen on a pretty constrained budget! I will return to the kitchen once it is complete with another post.

Thursday, January 20, 2011

Moving along, but nothing to see!

Dear readers: much to my chagrin, it's been almost a month since I've posted. There has been great progress, but this is a challenging period in construction to blog about. Unfortunately, I can never get photos of completed work because it gets covered up almost as soon as I see it, for protection! The stranded bamboo floors are in, and look beautiful, but were covered up within hours of install. The concrete floor on the 3rd level is poured, but they kept it initially covered by wet curing blankets, and now by brown paper because the walls are being painted (I'm very curious to see what, if any, cracking we have). The floating stairs were being installed today, but there is sawdust everywhere so I didn't take pictures. The kids bathroom is tiled, and the master bathroom is partially tiled. The kitchen and bathroom cabinets are in, but there are some issues with the kitchen cabinets that will get fixed before I shoot the pics.

They're painting this week and next, so the house is sheathed in plastic. But be ready for a fast burst of posts on interior finishes right after that!